The abdominal plank is a key exercise to strengthen the abdominals and core. Incorporating the plank into your abdominal exercise routine can provide numerous benefits to your health. It is one of the best alternatives for training, even if it is difficult for you to understand at first or you do not know how to incorporate it into your routine.
The importance and advantages of the abdominal plank are proven. Below, we explain in detail how to do it correctly, the muscles it works, common mistakes and variations to increase its difficulty, among other issues. Keep reading until the end to find out everything!
What are the benefits of the abdominal plank?
Abdominal planks offer a variety of physical benefits. To begin with, this posture serves to strengthen the core, which is essential for any training program. Because? Because if your abs are strong, they not only look and feel good, but they also help stabilize, balance and strengthen the body during almost any physical activity.
In turn, core strength is the basis for coordinated and powerful athletic movements. Additionally, it can reduce stress on joints and improve posture. Although the plank focuses on strengthening, since it involves several muscles, it also helps burn calories. Do you understand how it benefits in every way? Especially in what an athlete needs most!
How to train the abdomen with a plank in the correct way?
As with practically all physical exercises, the first step to see the advantages and perceive results is to develop the technique correctly. To do the abdominal plank , you must apply the following.
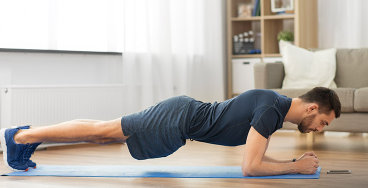
Initial position
You have to start as if you were going to do a push-up, but with some difference. Lie face down with your forearms and toes on the floor.
Your elbows should be directly under your shoulders, and your forearms should be facing forward.
The head is relaxed and looking towards the ground.
Muscle activation
- Keep your back in line with your legs and do not relax or drop your midsection at any time.
- Contract your abdominal muscles by bringing your navel toward your spine.
- Keep your torso straight and rigid, forming a straight line from your ears to your feet, without arching or bending your body.
- Take deep breaths while holding the position, but do not relax your body.
Also make sure your shoulders are down (don't pull them up toward your ears). And the heels have to be on the balls of the feet. Regarding duration, you should hold the position for 10 seconds and work progressively until you hold it for between 30 and 60 seconds . You can then rest on the floor to avoid exhaustion and move seamlessly to the next set.
Common mistakes with the plank exercise
When it comes to maximizing benefits and preventing injuries, you are bound to avoid the following mistakes with this abdominal exercise :
Arch your back
Avoid arching your back to ensure proper activation of the abdominals.
You should also not sag your hips: if your hips sag, this indicates abdominal fatigue. Finish the isometric plank and adjust the position if necessary.
Lift your head
The head must be aligned with the body. Do not raise your head for any reason, as this causes tension in the neck, especially if you do it over and over again.
Other ways to do an isometric plank
Also, remember that the abdominal plank is not the same for everyone. The way to do it may vary depending on certain needs or even personal issues. Let's look at alternatives.
In table position
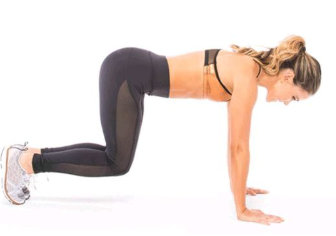
Practice from a tabletop position by actively pressing your hands into the floor and contracting your abs.
Inclined

Perform the plank with your forearms or palms resting on a bench or step.
Advanced variations
Just as the different exercises are designed for beginners, the positions also evolve or receive certain changes to satisfy the most experienced. In this case, there are two options.
Plank with leg raise
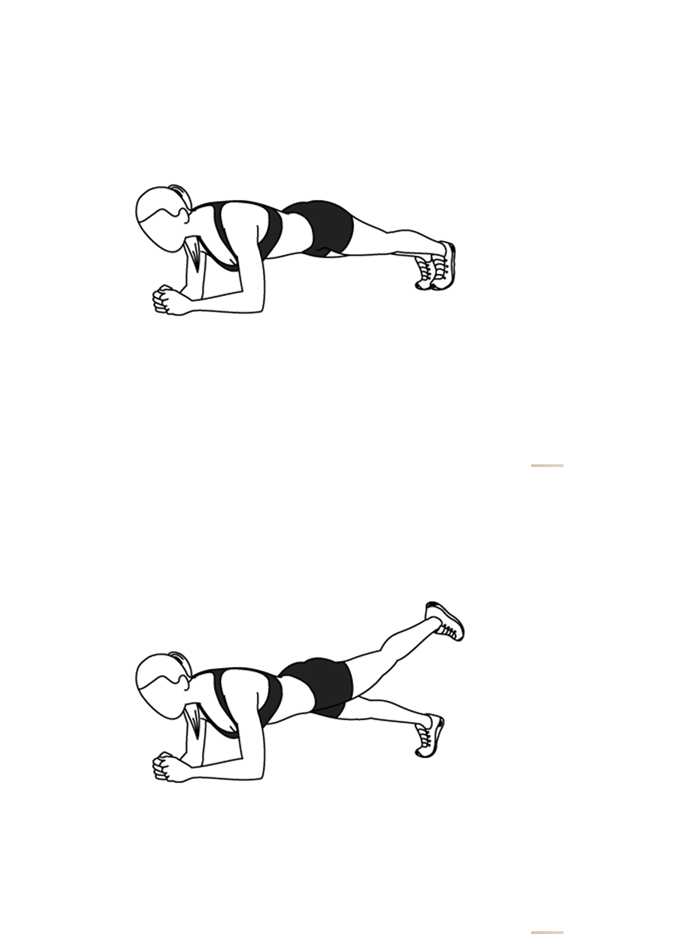
From the plank position, slowly raise one leg and lower yourself down. Alternate between both legs.
Perform two or three sets of 10 repetitions.
Plank with arm lift
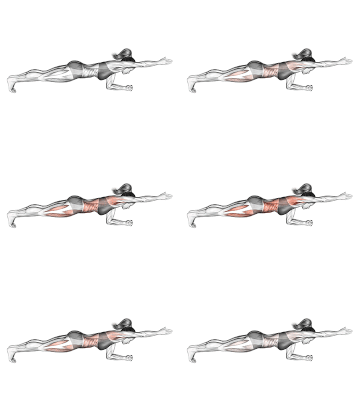
Add variety by raising the opposite arm during the plank.
Perform two or three sets of 10 repetitions.
Short plank sets
Instead of holding a plank for 30 seconds or more, do short sets of 10 to 15 seconds, with some rest in between. On the other hand, avoid any type or variant with its respective difficulty if you are experiencing a shoulder injury. And if you are a pregnant girl, consult with your doctor or physical therapist to determine whether or not you can perform this exercise and with what degree of demand.
How to do the side abdominal plank and what are the differences?
The side plank is an excellent exercise to strengthen the abdominal oblique muscles, which are not worked as much in traditional exercises such as classic abdominal crunches. Simply put, you will keep your body on your side in a straight position, and you will be supported only by one arm and the side of one foot.
Strong obliques are essential as core stabilization muscles. Beginners should develop the necessary strength and balance with specific warm-ups for the oblique abdominals, and with assisted versions of side planks, before advancing to the traditional side plank. You can include side planks in your core exercise routine, in Pilates, or in your yoga practice.
You might be interested in this:
How to do a side plank?
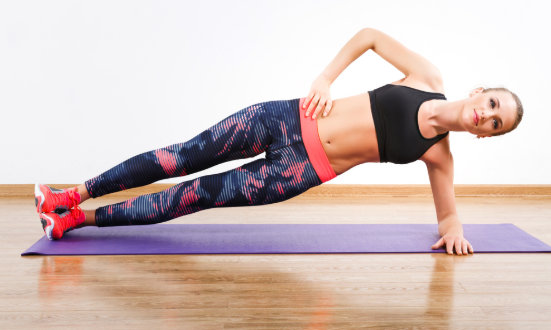
To work your abs with the side plank , lie on your right side, with your legs extended and stacked from your hips to your feet. The elbow of the right arm should be directly below the shoulder. Make sure your head is aligned with your spine. The left arm can be aligned along the body. This is the ideal position. Additionally, put the following into practice:
Activate the abdominal muscles by bringing the navel towards the spine. Take a breath.
Lift your hips and knees off the floor as you exhale. Your torso should be straight, without sagging or bending. Stay in position.
After several seconds (you can take a few breaths), inhale and return to the starting position. Switch sides and repeat.
Your goal should be to hold the top position for about 60 seconds.
Benefits of the side plank
The main muscles involved in this exercise are the obliques, along with the gluteus medius and gluteus maximus to stabilize the hips. The shoulder stabilizers are also activated to maintain alignment.
This exercise puts no pressure on your lower back or neck, unlike many core exercises. During pregnancy, the side plank is preferred as it puts less stress on the core abdominal muscles. In turn, the side plank is considered a balance exercise, so it will help you build a solid base by improving your posture and coordination.
Other variations of this exercise
Lateral twist
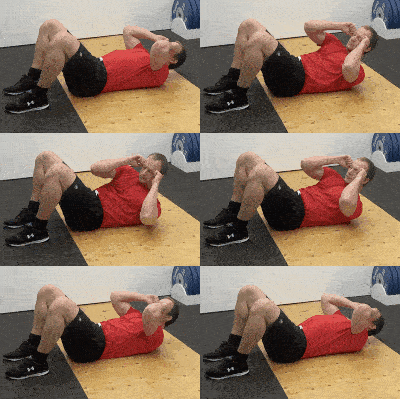
Gradually perform lateral twists before fully carrying your body weight.
Warm up your obliques with small lateral raises.
Start lying on the floor with your knees bent and feet supported. Do some simple straight lifts to start.
When you're ready, perform the lateral raises to the side moving slowly for maximum benefits.
It is recommended to do at least five lifts on each side.
From the knees
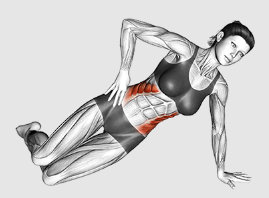
Graduate the warm-up with a slight challenge by sitting with your weight on your hips with your legs bent.
Support your body weight by extending your arm on the same side of your hip as you sit and placing that hand on the floor.
Keep your hips on the floor and lean into your hand. This will provide isometric work to the oblique muscles.
Stay there for 20 to 30 seconds and repeat on the other side.
On one knee
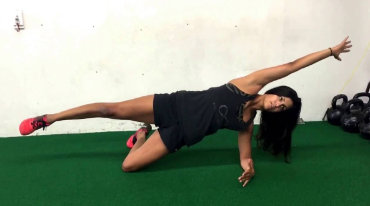
If you can't hold the standard pose, the one-knee side plank position is perfect for developing strength in your obliques.
From a sitting position, lower your body slightly so that the weight rests on your hips and the side of your thigh closest to the floor.
The leg needs to be slightly bent to facilitate a safe position. It also supports the weight on the forearm on the same side.
Stay up to 1 minute in this position and then change sides. Work to maintain good form and add 1-2 seconds each time you practice this pose.
With a balance ball
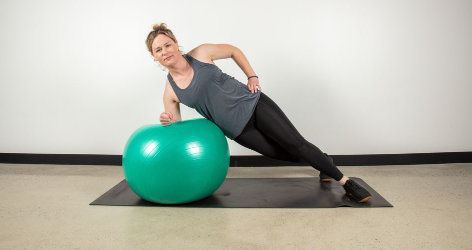
If you need a more advanced version, you can work on your muscle balance and engage more intercostal muscles by using a stability ball or Bosu ball under your side.
The ball will challenge your alignment and overall balance of your body. If you're having trouble, widen your base of support by placing your top foot in front of the other on the floor.
Common mistakes in side planks
To get the most benefits from this exercise, avoid the following mistakes or actions.
Sink your hips
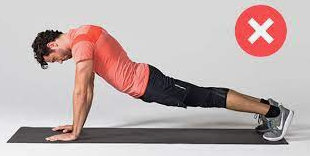
If you haven't developed enough strength, your hips may sink and you won't be able to maintain a straight line. This means that your core is no longer holding you in place and you are not getting the benefits of the exercise.
Roll forward
Without proper strength and balance, you may not be able to maintain the position and find yourself rolling forward (not being able to keep your hips and legs stacked). If this happens, try to correct it. If this is too difficult, try lowering your bottom knee and maintaining a straight line.
Hold on too long
At first, you may only be able to hold the side plank for a few seconds. As soon as you start sinking or rolling forward or backward, it's time to finish the plank before you injure yourself.
Safety and precautions
Do not do this exercise if you have shoulder, arm, elbow or ankle problems and consult your doctor or physical therapist. Even if your body is in an optimal state, stop if you are feeling pain at any time.
The conventional or side plank is a valuable exercise to strengthen and stabilize the core, obliques, and improve balance and coordination. In essence, it is abdominal work, but also with interesting differences to address compared to other abdominal exercises. Therefore, the also called isometric plank is more than recommended for you.


